Control a Pan Tilt Zoom Security Camera (MotionEye Actions) in Home Assistant

Control a Pan Tilt Zoom Security Camera (MotionEye Actions) in Home Assistant

pan tilt zoom security camera in home assistant

Home Assistant support for MotionEye cameras limited. I created a custom component with auto-discovery and actions for my pan tilt zoom security camera.

You can find the Home Assistant MotionEye component on Github.

I’ve been working on automating my garage workshop. For me, it was important to be able to use MotionEye to control the camera. I find that a dedicated UI for a CCTV system is a nice way to control home security. At the same time, we use Home Assistant as our hub for everything in the house. I wanted to make this integration easier and more native to Home Assistant cameras.

Our IOT is DIY.

But any IP camera should work with MotionEye and the technique described here.

Home Assistant Security Cameras

The typical MotionEye configuration in Home Assistant uses the mjpeg camera. This supports both still images and video streaming. However, it has two main weaknesses:

  • Each camera must be configured and added individually.
  • MotionEye actions cannot be triggered by Home Assistant.

This means the user is left with two potential “hubs” for their devices. A pure Home Assistant UI would be preferable to me over something like a custom panel.

But what about the MotionEye community add-on?

This is no different than a custom panel. It requires loading the full MotionEye UI in an iframe.

To create a native integration with Home Assistant, I reverse engineered the MotionEye API. The process of signing requests with a password is quite simple. This means it is relatively easy to interact with MotionEye directly from the backend Python code executed by Home Assistant.
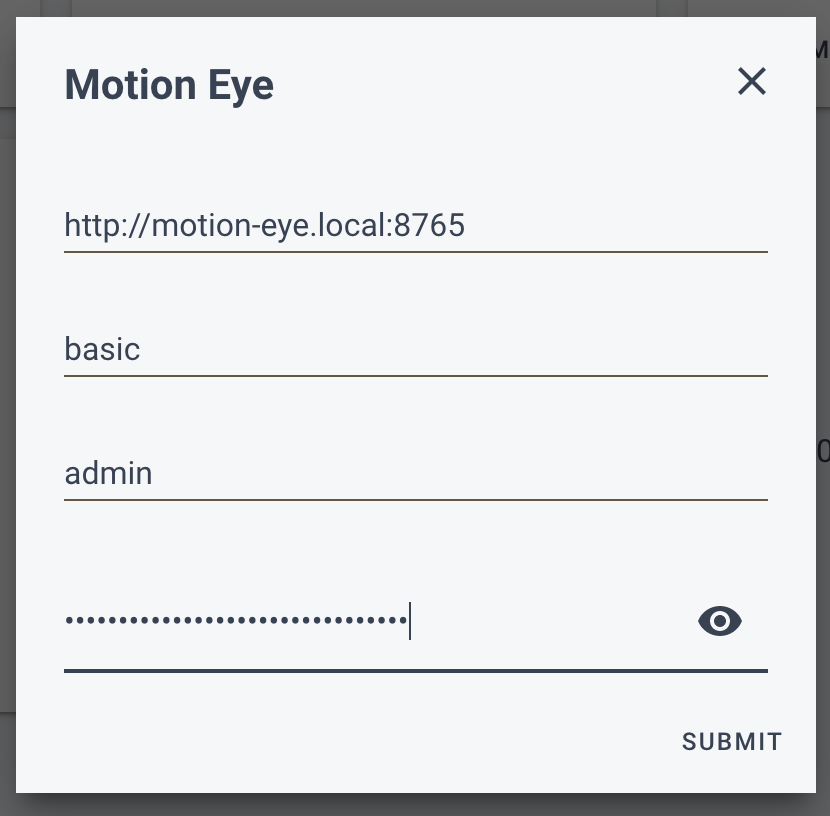
motion eye config
I’m actually connecting to a Kubernetes instance of MotionEye here.

When the custom component is added, it automatically detects all MotionEye cameras as Home Assistant starts up. It can be configured from the Home Assistant UI or from a configuration file. The only two configuration parameters that should be changed are the URL and the password. In general, you want to use the admin+basic auth for full control of the cameras. All of this can be configured with YAML as well, of course:

motion_eye:
  hosts:
    - url: "http://motion-eye.local"
      username: !secret motion_username
      password: !secret motion_password

Upon restart, Home Assistant will automatically create camera entities for each camera found at http://motion-eye.local with the appropriate MotionEye camera name. Each camera entity will contain all of the MotionEye camera attributes.

A Raspberry Pi with MotionEyeOS installed will have a web UI on port 80. I have multiple Raspberry Pi Zero Ws, and I just add each as a separate integration to Home Assistant. Their configuration URLs are http://192.168.0.161, etc.

If you’re trying to connect to a MotionEye instance between Docker containers (or Kubernetes pods), you need to make sure that the Home Assistant instance can access the target URL. For example, you should be able to to curl http://192.168.0.161. I happen to run Kubernetes for all of my home automation, so I actually use the URL http://motion.home.svc.cluster.local:8765 for one of my integrations.

When in doubt, you can use the “Network Inspector” feature of your browser while using MotionEye:
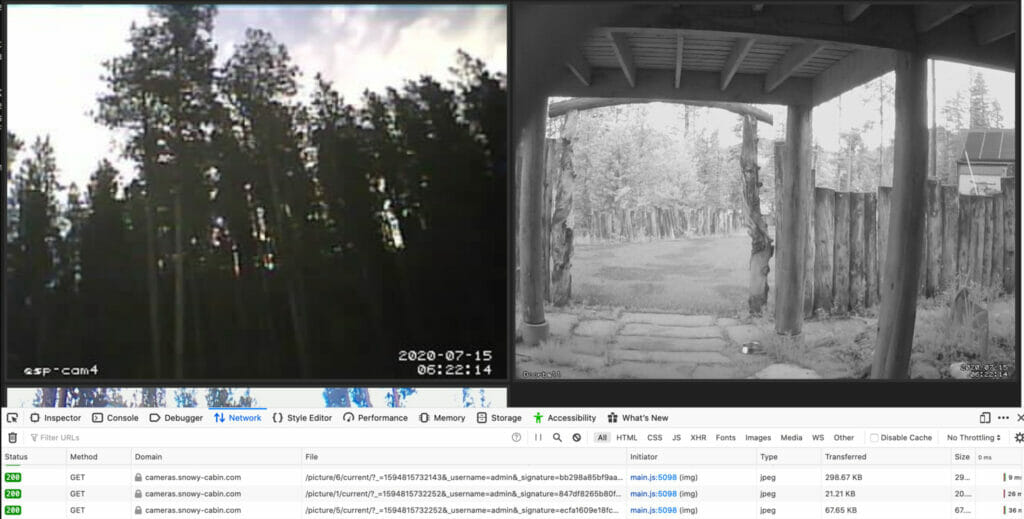
Screen Shot 2020 07 15 at 6.22.13 AM
The configuration URL is everything before the /picture/x/current/? parts.

In the above screenshot, the correct configuration URL would be https://cameras.snowy-cabin.com. When running Ingress, I have seen configuration URLs like http://192.168.0.14:8123/api/hassio_ingress/7BYKXJ640FS5Ko-o5D9Sq8ZYBo5B7XzFbSUcPSxL-yQ (screenshot of network inspector).

Likewise, when you press an action button on a camera, you should see a similar request made.

Taking a snapshot is a “camera action” built-in to MotionEye.

It is one thing you might want to do from Home Assistant. I’ll use a more complete example of actions below.

Pan Tilt Zoom Security Camera

In order to monitor various CNC cuts, I installed a Pan-Tilt HAT on my Raspberry Pi security camera. I’ll use this as an example of why a native Home Assistant integration for MotionEye is useful.

If you're new to Raspberry Pi, the popular CanaKits are a great place to start. I prefer to buy the Raspberry Pi 4, power adapter, micro SD cards, and heatsinks separately. Not only is this cheaper, but it reduces e-waste.

The following are affiliate links to other parts I used in this project. I never link to a product that I have not personally used.

The first thing I did was to run the web_Python example from the product and verify that I could control the HAT. Then, I added a new endpoint to main.py:

@post("/cmd")
def cmd():
    global HStep,VStep
    code = request.body.read().decode()
    print "code ",code

    if code == "stop":
        HStep = 0
        VStep = 0
        print("stop")
    elif code == "up":
        VStep = -5
        print("up")
    elif code == "down":
        VStep = 5
        print("down")
    elif code == "left":
        HStep = 5
        print("left")
    elif code == "right":
        HStep = -5
        print("right")
    return "OK"

Finally, I turned the web control into a systemd service so it would run continuously. This allowed me to create MotionEye action buttons which trigger the different pan tilt zoom security camera actions.

zoom pan tilt from the MotionEye UI
The MotionEye UI with pan/tilt action buttons.

For example, the down_1 executable file contains the following shell script:

#!/bin/bash
curl -d 'down' http://192.168.0.101:8001/cmd && sleep 0.1 && curl -d 'stop' http://192.168.0.101:8001/cmd

There are various ways this action could be improved. Right now, it’s running the movement for 1/10th of a second per click (because MotionEye does not support button-down/button-up events). But it gives me the tools I need to control the camera from a MotionEye action.

The important bit is that any MotionEye action will be exposed to Home Assistant.

MotionEye Actions with Home Assistant

The custom component adds various attributes to the camera when it is discovered.

For example, the following Home Assistant template:

{{ states.camera.workshop.attributes.actions }}

Informs me that the camera supports ['snapshot', 'up', 'down', 'left', 'right']. Each of these may be used as an argument with the motion_eye_action event. For example, to tell the camera to move down, the arguments would be:

camera_id: camera.workshop
action: up

Putting this all together, it’s easy to make a picture glance card that contains the various actions:

title: "Workshop"
camera_image: 'camera.workshop'
entities:
  - entity: 'camera.workshop'
    icon: 'mdi:arrow-left'
    tap_action:
      action: call-service
      service: script.motion_eye_action
      service_data:
        action: left
        camera_id: 'camera.workshop'
  - entity: 'camera.workshop'
    icon: 'mdi:arrow-right'
    tap_action:
      action: call-service
      service: script.motion_eye_action
      service_data:
        action: right
        camera_id: 'camera.workshop'
  - entity: 'camera.workshop'
    icon: 'mdi:arrow-up'
    tap_action:
      action: call-service
      service: script.motion_eye_action
      service_data:
        action: up
        camera_id: 'camera.workshop'
  - entity: 'camera.workshop'
    icon: 'mdi:arrow-down'
    tap_action:
      action: call-service
      service: script.motion_eye_action
      service_data:
        action: down
        camera_id: 'camera.workshop'
  - entity: 'security_feed.workshop'
aspect_ratio: 0%
type: picture-glance

Home Assistant UI

I added a few more actions. For example, I can start and stop the Maslow DIY CNC machine, shopvac, and other appliances via the buttons on the Lovelace card:

Pan Tilt Zoom security camera in home assistant
The final Lovelace UI for the pan tilt zoom security camera.

The power outlets next to the camera (in the photo at the top) are controlled by 4 relays. These relays, in turn, are controlled by the GPIO pins and Node RED.

If you have troubles with the custom component or this setup, leave a comment or drop me a line.

Build Guides

Looking for even more detail?

Drop your email in the form below and you'll receive links to the individual build-guides and projects on this site, as well as updates with the newest projects.

... but this site has no paywalls. If you do choose to sign up for this mailing list I promise I'll keep the content worth your time.

Written by
(zane) / Technically Wizardry
Join the discussion

Menu